Background

Saturday, March 31, 2012

DRCC Session 2 Class #7


This week I've decided to do 2 title pages that could also be made into a 2 page layout. The focus for a title page is generally one large photo to help determine the type of book you are looking at. This isn't necessarily only for title pages, as you can definitely use one large picture for a one- page layout within an album. 

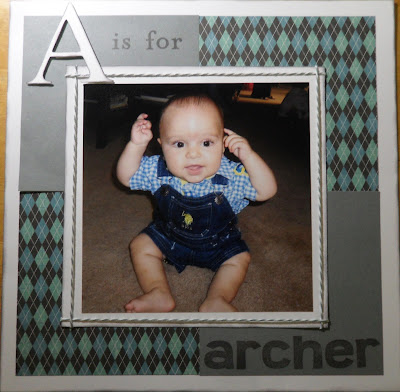
What I enjoyed most about this page was that everything just seemed to click. I had the argyle paper from the Cruisin' paper pack, the super cute button brads and the new Grey Wool bakers twine. The title just seemed to come to me once I remembered this great picture of Archer that a friend of mine took at Christmas. 


I tried to make the title look almost like a shirt with the button brads in between the embossed words, although it's somewhat difficult to tell that the brads look like buttons. I still like it though. 


I created this layout as a separate title page, but it can also become an accompaniment to the previous layout just with simply removing the one large picture and mat and replacing with 4 pictures (4"x4") in each corner and omitting the title. I did like how this layout turned out, mostly because it kind of looks like Archer is making an A with his arms. 


To use the bakers twine in a different way, I used it to frame the picture. I inked the edges of all of the white cardstock and the die cut initial to make the pieces have more definition when placed against cardstock of the same color. I then stamped the rest of the title. 

Monday, March 26, 2012

DRCC Session 2 Class #6


I used the Florentine paper pack for this layout. It has some great colors that complement snow and blue sky shots so it's very versatile for any scenic pictures. I used Cocoa ink and clear embossing powder for the "what a" using the Trinity Alphabet. I stamped "view" in Twilight ink using the Rustic alphabet on a piece of colonial white cardstock, which I then cut out and popped up using 3D foam tape. 


In order to add more pictures, I made a trifold out mini book on my layout. I took a 7x4" length of creme brulee cardstock and used a border punch on one end. After adhering my front picture, I folded the leftover piece of cardstock. 


I then used a 12x4" piece of Colonial White cardstock and folded it in half. I adhered my photo's to 3 sides with the folded portion to the right side. 


I attached the Creme brulee cardstock to the underside of the middle panel and attached ribbon to form a closure. 

Monday, March 19, 2012

DRCC Session 2 Class #5


For this week's layout, I wanted to play up the Lucy paper that already has little crowns drawn on it so I cut out the title and the big crown from my Big Kids cartridge on the Slice. I like the addition of the Grey Wool paper to this paper pack as it gives a nice soft touch that isn't super girly. It tied together all of the pictures of my niece that were taken over a span of time. 

To create the ribbon flower in the top right corner I did the following with a length of stitched grosgrain ribbon:

Step 1: From the same side of the ribbon, pull the ends of the thread away from the ribbon so that you have enough to grab onto. 
Step 2: Continue pushing the ribbon together while keeping both ends of the thread loose until the ribbon has gathered completely in the middle.

Step 3: Tie the thread in a knot tightly to secure the circle shape.

Step 4: Clip off the end of the thread and use a Glue Dot to adhere the 2 ends of the ribbon together so that they don't show. 
Step 5: Adhere a button or other embellishment to the middle of your flower and you are ready to adhere it to your project using more Glue Dots.

You can change the size of the flower by using different sized ribbon and also using a longer length of ribbon. I used approximately 10" of ribbon, but this ribbon is 1" wide.


Sunday, March 11, 2012

DRCC Session 2 Class #4


I used the Pemberly paper pack for this layout. I like the continuation of the lighter blue patterned paper as it appears to be underneath the picture and continues on the the right side. For the title, I had to create the banner from scratch. I took a stamp of an ice cream cone and stamped it on my cardstock. Then I cut out the triangles, flipped them over and then stamped dreams on to my banner. I used tape runner to keep them in place before inserting my brads.

Monday, March 5, 2012

DRCC Session 2 Class #3


So after I uploaded these pictures, I realized that my Cranberry red paper looked very orange. Please don't get discouraged, I just need to photograph this layout in better light and then the color won't look so off. Once I get new pictures taken, I will replace them on my blog. 

This is somewhat of a generic themed layout using the new Superhero paper. I chose to use pictures with a Flames theme as that's what worked best for me. I used my Slice to cut out the title. I originally cut out "One of a kind", but as there are 3 Flames fans, I just cut off the "one" and then used my Slice again to cut out a large 3. 


We'll be using the scoring blade from paper trimmers in class to create the borders as well as to create these funky pennants. They're not really hard to make, you just need to know the proper dimensions. I sanded on top of the scored borders and the edges of the pennants to bring out the white core.