Background

Showing posts with label 3D embellishment. Show all posts

Sunday, February 26, 2017

Scrapaholics Unite Session 6 Class 4


This week is about the Hello Lovely paper. This beautiful floral has a great colour combination with Sea Glass, Sorbet, Fern and New England Ivy. I themed this layout as a love layout, which can work for anything from family, kids, couples and weddings. To add some interest to the layout, I used the January stamp of the month called Adore You. It has a lovely script title and some beautiful flowers and sayings. I also used the new shimmery blush ribbon on the right page. 


For this heart, I stamped the full image once in Sea Glass and cut it out. Then I stamped just the flowers and leaves in Fern and again in Sorbet. I cut out all of the flowers and leaves for the Fern stamp, then adhered them to the heart with 3D foam tape. I cut out only the flowers from the Sorbet stamp and directly adhered them to the Fern flowers to create some dimension. I finished the heart off with the saying in Sea Glass. 

Saturday, October 29, 2016

Scrapaholics Unite Session 5 Class 6


Swan Lake is the paper pack I used for this layout. I decided to play up the femininity of the paper and use a bit of bling to fancy it up. For the title, I heat embossed in gold on black paper so it gives more of a distressed look than straight embossing. I added jewels and sequins as well as the new black and gold ribbon on the top left. I finished off the layout with some gold studs in the bottom corner to draw your eye across the page. Now I just need some girls night out pics to put on this layout. Drinks anyone?

Monday, September 26, 2016

Scrapaholics Unite Session 5 Class 1


Welcome back! I have had quite the busy summer, but the nice thing is that I have lots of pictures to scrapbook. I will definitely be using our adventures in the summer as inspiration for some class layouts this session. This first layout is using the Florence paper from a few Seasonal Expression catalogues ago. It has a beautiful subtle pattern in both the red and yellow papers. The zipstrip also has this beautiful flower detail on it that I used as inspiration for the title block and the quote papers. I added some 3D dimension by stamping the title twice and cutting out the Love and popping it up with 3D foam. As well, I only adhered the middles of the flowers and bent the petals up so that they stick up. I finished off the layout with some sequins and some a bit of journaling inside one of the pennants.

Saturday, February 13, 2016

Scrapaholics Unite Session 4 Class 3


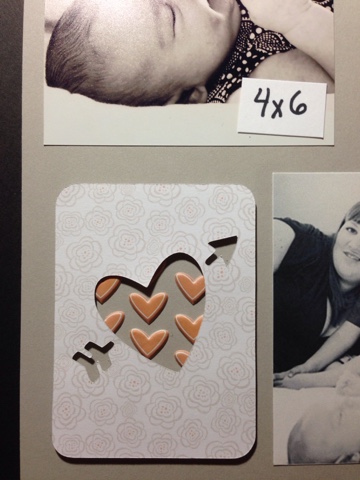
I am in love with this layout, not just because of my adorable kids, but because it has a wonderful subtle tone to it. This is the Charlotte Paper Pack and it has this great heart and arrow theme to it. Perfect for a love layout and just in time for Valentine's day. I used a Picture My Life card for the left side of the layout and added a simple title from the Artistry Cartridge with some black hemp tied around some of the letters. Using the Artfully sent and Artistry Cartridges, I made the heart die cuts for the right page. I popped up the heart and arrow card and then put 3D hearts underneath. To pop out the heart circles, I just placed them on some Smoothie cardstock, added a few stamps and I was done. See the close up pics of the title and heart below. 


Sunday, November 15, 2015

Scrapaholics Unite Session 3 Class 5


Welcome to the Zoe paper pack. It is full of different colored patterned papers, like this sorbet polka dot and a glacier houndstooth pattern. It's really versatile. This layout, to me, was the perfect complement to the new Hostess Rewards stamp set #makesmehappy. It's a great stamp to go with Social media pictures. I just need to print a few more pictures for the bottom of the layout. Just ran out of time! 


I arranged several different stamps to create this "journal" block. Most of these stamps are from #makesmehappy, but some are from other stamp sets. I made the one that stood out to me, instalove, in sorbet so that it was highlighted. I accented with some 3D stars and hearts as well as some thin shimmer trim.

Sunday, April 12, 2015

Scrapaholics Unite Session 2 Class 11


This is the new Blossom paper from the Seasonal Expression 2 catalogue. It's bright and summery so what better theme to choose than ice cream! This is the June Stamp of the Month so if you like this stamp set as much as I do, you are able to purchase it during the month of June! I accented with some oversized brads I had. 


To add some 3D element to the ice cream, I first stamped on the base page in the neutral Desert Sand. I then stamped the ice cream again on an extra piece of cardstock in the colors, cut out what I wanted popped and then adhered with 3D foam tape. 

Monday, February 2, 2015

Scrapaholics Unite Session 2 Class 2

Valentine's Day is right around the corner and the Heartstrings paper pack is perfect to document all your lovely pictures. I like the contrast of the Lagoon and Whisper grey colors with the Cranberry and Hollyhock. I brought a lot of texture to this layout by using pattern stamps, such as the border on the right side. As well, I used the patterned paper from the pack along with the zipstrip which is the piece of paper with the arrows on it. There is versatility in the layout with the pictures as you are able to rearrange the placement to suite your needs.


I didn't use one large title this time as I felt that there was enough with the stamped sentiments. To customize the Dimensional Element chipboard hearts, I stamped on them using different patterns and then layered them with 3D foam. 

Sunday, June 1, 2014

DRCC Session 7 Class #6


I thought hard about what type of theme to use the Ariana paper pack for and I realized that it's a great summer layout. I also had this great sketchy stamp of fruit that I've been wanting to use for quite some time. We are hoping to get out this summer and go to some Farmer's markets and maybe some pick your own orchards. Those pictures would be great with this layout and all I have to do is just print them!


To make the fruit more 3D, I stamped it on the page once in chocolate ink and then again in red on a scrap piece and cut just the fruit out and put it right on top of itself with 3D foam tape. 

Sunday, September 8, 2013

Little Monkey


This paper and accessories pack is from Best Creation Inc. called Safari Boy. I think I got this pack just after Archer was born, so over 2 years ago. I had taken these pictures in anticipation of a 2 page spread because this outfit was one of my favourites. I love argyle and I love brown and blue together. Needless to say, my sister know all of this and therefore picked up this adorable outfit when she heard I had had a boy. Then I just had to wait until he was big enough to wear it. At least he could play with the stuffed monkey from the beginning, which he loved! It was a great toy for him to chew on. Lots of arms and legs to go in his mouth. Just what a baby loves. 


For this layout, the pack came with these 2 sheets that I used as my base pages with a scene already on them. I love that certain aspects of the whole kit had glitter on it. Even though its a boy paper pack, the glitter works. I strategically placed the cut out in the centre of the pages to frame the pictures. I used the very appropriate sticker title included and just made a pennant background for it. We do call Archer monkey all the time, because he acts like one! The larger hearts were actually stickers that I dusted baby powder on the backs to get rid of the stickiness and then adhered them with 3D foam tape. I found the argyle ribbon at Michaels one day and knew it would perfectly match this paper pack and this layout. 

Tuesday, February 19, 2013

DRCC Session 5 Class #4


This week is more advanced than previous classes. I liked this layout as it has a lot of picture space and in order to put more on my layout I've incorporated a fold out of the pictures using half of a photo storage page on the right side. I'll also be demonstrating how to do the scallop edge with a corner rounder. I used the Irresistibles Dimensional Elements for my title. In order to make the emboss resist design already on the chipboard visible, I sponged Twilight ink over top of the letters. I stamped my animal critters on white cardstock, cut them out and then adhered them with 3D foam tape.


Here is the expanded view of the photo storage page mini album. I secured the folded up mini album with ribbon, a ribbon slide and brads. I left it loose enough to slide off of the page in order to expand it. 


This is the other view. I used hinges to adhere the photo storage page to the layout. I chose to put the hinges through my photo so that the picture wouldn't bubble over it, but you could adhere the photo over top of the hinges. I will be cutting the page protector to allow for the expansion of this mini album once the class is over. 


Saturday, November 3, 2012

DRCC Session 4 Class #9


I had a great idea a couple of months ago to make a snowglobe using the treat cups from CTMH. The  execution of it was part trial and error, but I figured it out. I stamped my snowman and kids image on the twilight paper in white daisy ink. I then stamped and heat embossed in white the image again on chocolate paper, then I cut out the snowman and adhered it on top of the original snowman. I poured some glitter into the treat cup, removed the adhesive ring and then placed the twilight snowman scene onto the cup. I then cut the twilight paper around the treat cup, adhered a ring of white paper over the edges of the treat cup and then trimmed the white paper. 


Here is a close up of the snowglobe. I made the stand by rounding the corners of a rectangle of chocolate paper and then punched out a very small semi circle using the circle punch in the centre so that it appears as though it's cradling the globe. To add some sparkle to the layout I found some glittery foam snowflakes.