Background

Thursday, December 8, 2011

DRCC Session 1 Class #7


Considering it's almost 2 weeks until Christmas, I thought a holiday layout would be nice for the last class before the holiday break. For the title, I cut out Noel on my Slice and placed it on top of vellum with 3D foam to. I then accented with some gold stretchy cord. I also used the cord on the stockings. 


For the accents, I stamped them on Colonial White paper and then cut them out so that the detail in the stamp is more visible. I heat embossed the sleigh runner in gold directly onto the layout to give the it some extra shimmer. 

We don't have a class until January 10, 2012 but check back here as I hope to keep posting some of my other projects. Merry Christmas!

Friday, December 2, 2011

DRCC Session 1 Class #6


This was a slightly challenging layout as I originally had a lot of white space at the top. White space can be important in a layout, but not if it makes the layout look too sparse. I will make adjustments to this layout in the future as the picture on the left side should be a 5x7 and of course I need to journal on the piece of cardstock on the right. This layout can also be flipped so that the yellow is green instead. It depends on the pictures used. 


The technique we will be using in class will be stamp kissing. That is when you take a solid stamp and kiss it onto a patterned stamp to give the image texture.


Saturday, November 26, 2011

Ribbon Tree

I thought I would try making a ribbon tree since my paper trees turned out pretty well. This was quite labor intensive because I picked smaller ribbon and decided to evenly place my ribbon in rows instead of more abstractly as I've seen other crafters do. For the star, I heat embossed a chipboard star with red glitter embossing powder. Then I wrapped wire around the star and heat embossed it again to cover the wire with red glitter.

If you like this tree, I will be selling it and some of my other Christmas crafts tomorrow at the M.O.B. Craft Fair and Trade Show at the Fish Creek Library from 1-4pm.

Thursday, November 24, 2011

DRCC Session 1 Class #5


This week we will be creating our own background page by random stamping. We will also be exploring a different kind of journaling using strips of paper. I also added some embellishments using the new wooden buttons.

Friday, November 18, 2011

Craft Fair Projects

I'll be at the Varsity Community Centre Craft Fair tomorrow, November 20 from 10am until 3:30pm.

I will also be at the Fish Creek Library, 3rd floor, November 27 from 1-4pm for the Mothers Opposed to Boredom Christmas Trade and Craft Fair.

These are the crafts I made to sell this year. If you like something that you see and are not able to make it to the fairs, please email me.

Take Out Boxes with goodies inside

Paper Christmas Trees

Pillow Box Gift Card Holders

Wall Hangings

Wall Hanging

Wall Hangings

Wall Hangings

Wall Hangings

Snowman Poop - Front view
Snowman Poop - Back view

Wednesday, November 16, 2011

DRCC Session 1 Class #4


I used the new Roxie paper pack from CTMH for this layout. I love the contrast of the feminine pink rose paper with the pink and black plaid. I used all parts of the paper for this layout, including the zip strips as the scalloped border.


I'll be teaching how to emboss at the next class for the title here. I just used black embossing powder and stamped the title on with Versamark ink. I also embossed the "too cute!" sentiment onto the chipboard flower.


We will also be getting a chance to add some bling to the page with the new Bling buttons and as an extra sparkle, I placed the mini sparkles on top of a few of the paper gems on the zip strips. 

Thursday, November 10, 2011

DRCC Session 1 Class #3


For this layout, I used 4-4x4 photo's and 1-8x10 photo. If you don't have an 8x10 photo you would like to use, 4-4x5 pictures can also be bunched together in that area. Color photo's are fine as well. We'll also be focusing on inking at the next class and by that, I mean edging paper and photos in ink to give them definition. I'll also be demonstrating a neat trick on how to cut your ribbon so that your knot is placed exactly where you want it.

We'll also be using some a few embellishments, a rub-on, brads, photo clips and the new Foundry Pin Clips pictured here.


For my students, if you would like a deep purple or a dark green in place of the brown cardstock, please email me by Monday for when I prep the class. Start thinking about title's too! See you on Tuesday!

Please email me as well if you would like more information on my classes. 

Wednesday, November 2, 2011

DRCC Session 1 Class #2


The theme of Class #2 is flow across 2 pages. You'll see that the leaves are placed across the layout as if the wind has blown them and it brings your eyes from the left to the right. We'll also be using Stickles (glitter glue), rhinestones and 3D foam tape. For the more adventurous students, I'll also be demonstrating 2nd generation stamping.

I'm using the Dreamin paper from CTMH and I've maximized the paper used as I've incorporated the border strip that is now on the new Background and Textured paper from CTMH.

This layout could also be changed up to become spring or summer themed taking advantage of the dandelion shapes in the brown paper.

Monday, October 31, 2011

DRCC Session 1 Class #1


I'm teaching a scrapbooking class at the Deer Run Community Centre starting tomorrow evening, November 1, and I'm hoping to use my blog as a means to teach some other people as well. It's a 10-week course and we will be completing a 2 page layout during each class.

This is the first layout that we're doing and can be changed to be party or children themed . It's a fairly simple one to get started, but it's teaching some basics. I'm concentrating on stamping with this class, although we are using chipboard and brads as 3D embellishments. The lesson is also about continuity. You can see that I'm repeating the stitching pattern that is on the star paper on my larger chipboard stars as well as using a similar flourish in the title as in the inner stamped star on the larger stars.

Please send me a message if you're interested in joining the class.

Thanks for stopping by!

Wednesday, October 5, 2011

Peek-a-boo Pumpkin Card


This was a fairly easy card to make and didn't require too many materials. I first covered a card base with my patterned paper (CTMH Believe paper pack). Then I took a 2" circle punch and cut out the circle. I used my Slice to cut out the pumpkin and the Happy Thanksgiving.  I then inked the edges of the cardstock for definition. Stickles glitter glue made a nice change for the dots to my i's. 

Inside view of the card
 I placed the pumpkin visible within the cutout, but not directly in the centre so as to make it more of a peek type of accent. It adds a nice holiday element to the inside of the card.

Close up of card detail
I used a scallop border punch for an accent underneath Happy and added the chocolate ribbon detail above.

Sunday, September 4, 2011

Irresistibles Chipboard

The Irresistibles Dimensional Elements Chipboard is a fairly new product from Close To My Heart. They have made the chipboard with a pattern that shows up once you have inked or chalked the pieces. This makes the products extremely versatile because then you are able to color your chipboard to match with your layout perfectly. All CTMH chipboard comes in white to easily alter it with ink, chalk, markers or any other type of medium. See the hearts and the swirl on the left side of my Sweet Smile layout above. 


To make your own Irresistible chipboard you just use an emboss resist method of stamping. Stamp the white chipboard with Versamark ink with the stamp of your choice, then use white embossing powder. After heat setting the powder, ink or color the chipboard with the color that co-ordinates with your layout. 

Thursday, July 21, 2011

Multiple Colored Stamping


This is a layout that I did quite some time ago, but I kept on forgetting to print the ultrasound pictures so I never seemed to finish it. I used the Wings paper pack from CTMH and the Take a Picture Stamp set. For the title I used the new Bohemian Alphabet for the word Attraction. I love how it has the flowers as part of the letter. 


This was one stamp from the Take a Picture stamp set and I wanted to showcase the butterflies coming out of the film. Using a sponge, I carefully applied the black ink to the film and the canister on the stamp, then used the vineyard berry ink for the start of the butterflies. With the juniper ink, I overlapped on some of the butterflies so as to create a subtle change in the color. I then stamped the image onto a piece of scrap paper and cut it out, adhered it with pop dots and was done. 

Friday, July 1, 2011

Dino-Mite


For this layout, I kept it fairly simple. I found the Mr. Boy paper pack from Bella Blvd worked perfectly with the cute dinosaur outfit that Archer is wearing. I took a close-up of the tag on his hoodie and printed the pic as a 5x7 so that it would be large enough. Then I cut it out and used it as the title.

Sunday, June 26, 2011

Shadowing a Title


I had originally thought up the title first because Archer was constantly putting his fingers in his mouth. Then he learnt how to take out his pacifier so it became super easy for him to eat his fingers even more often. I got some great pictures of the entire process one day when he was playing his Exersaucer. I used the Mr. Boy collection from Bella Blvd for my paper and accents. I originally tried placing the letter stickers alone on the layout, but the black lettering was just too dark against the green paper so the title almost got lost on the page.  


I arranged the letters on a piece of white cardstock first, then I penciled a line around the letters an equal distance apart. Using scissors and an exacto knife, I cut out the letters to create a shadow effect for the title. It was a lot easier than I thought it would be and it really made the title pop. I finished it off with fake stitching using a white gel pen. 

Thursday, May 26, 2011

Using a stamp in a different way


It's always fun to have more than one use out of things and stamps are no exception. With this card I followed an idea from CTMH and made the patterned stamp into flower petals. I stamped the image onto cardstock, then cut out each image and inked the edges. I then secured all of the petals with a corduroy brad. You'll also see the new button brads securing the quote at the top. This card was made using the Wings workshop on the go kit and co-ordinating accessories. Hope you like it!

Wednesday, May 11, 2011

Along came a baby

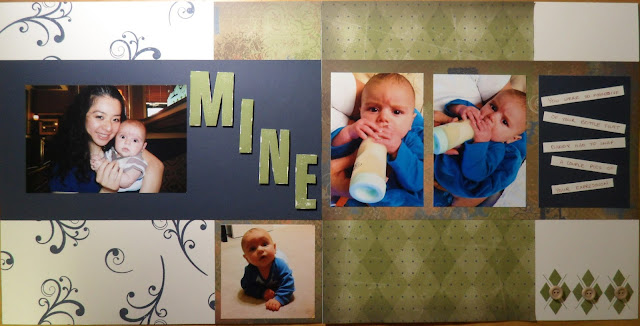
Sorry for the hiatus, but my little guy was born January 21 so we've been kinda busy since. I have been scrapping though, but not been able to blog. Here's a layout I just made on the Scrapbooking Retreat that we just had this past weekend in Banff. I had picked up the extra large buttons in a clearance sale about 4 years ago and finally was able to use them on this layout. Just goes to show that if you keep things long enough, you will eventually use them. I used my sister's Cricut Expression for the train (B is for Boys cartridge). I used the Friendship Large Alphabet for the title as well as heat embossing the stamped letters with clear powder just to make the title stand out. One technique I did learn from my sister recently was to use a white gel pen on colored paper to have the journaling stand out.

Tuesday, January 18, 2011

2011 Desk Calendar

Front View

Inside View

Back view

Hi all, sorry it's taken me so long to post, but we've been getting ready for the little one to be born as well as being super busy at Christmas and now I'm just playing the waiting game so I thought I'd catch up on some of the projects I've been up to. 

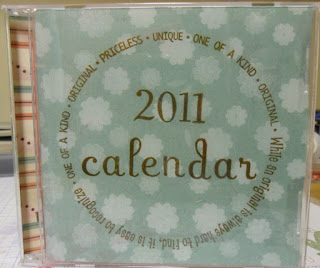
This is a desk calendar that I made from a blank CD Case. I removed the side of the case where you insert the CD and covered it with paper. After sizing the paper, I made mats for pictures and stamped the front, inside and back cover before adhering it to the plastic case with Mod-Podge adhesive. I then stamped the little calendar using CTMH's Moments In Time Stamp Set and made it tear away by stapling the tops of the paper together. These were great Christmas gifts for my co-workers and are re-useable by replacing the calendar year if you wanted to. 

Watch for some more project ideas or a birth announcement. Hopefully the little one decides to come soon. If not, I'll have lots of time to scrapbook before baby comes...