Background

Monday, November 23, 2015

Scrapaholics Unite Session 3 Class 6


I'm sorry to say that this is the last class for 2015. I will be starting another session in late January though. I've had a sneak preview of the new paper that is coming in the Seasonal Expressions book and it is cute! 

Talking about cute, my little munchkin #2 just fit with the Georgie paper pack with the fabulous pictures my sister took. At the first glance of this paper, I found it to be more boyish because it has a lot of blue hues in it, but using the yellow striped paper made it infinitely more feminine. Just like last week's layout, you can have the choice to use the circle paper as the base page or keep the yellow. I will also be giving my students the choice of title between "Sugar & Spice" or "Giggles & Grins" from the Cricut Artbooking cartridge. They are both in the same format and will work great with any cute baby layout. The versatility of this layout is such that you can place your pictures in any format that works for the pictures. Since there is no mat, you can add more or use less. 


To add some extra something, I cut out circles from the cardstock and patterned paper, then did the scissor distressing technique on them. To do the scissor edging, just open a pair of scissors and run the edge of the blade across the edge of the paper to distress it and fan it out. The more distressed, the better. It adds dimension and plays up the circles in the patterned paper. 

Sunday, November 15, 2015

Scrapaholics Unite Session 3 Class 5


Welcome to the Zoe paper pack. It is full of different colored patterned papers, like this sorbet polka dot and a glacier houndstooth pattern. It's really versatile. This layout, to me, was the perfect complement to the new Hostess Rewards stamp set #makesmehappy. It's a great stamp to go with Social media pictures. I just need to print a few more pictures for the bottom of the layout. Just ran out of time! 


I arranged several different stamps to create this "journal" block. Most of these stamps are from #makesmehappy, but some are from other stamp sets. I made the one that stood out to me, instalove, in sorbet so that it was highlighted. I accented with some 3D stars and hearts as well as some thin shimmer trim.

Sunday, November 8, 2015

Calgary Scrapaholic Session 3 Class 4


The Snowhaven paper pack from the 2014-2015 catalogue is a non-traditional winter paper. I played up the red and grey in this pack by creating a mask from the CTMH Artbooking Cricut cartridge. I used the mask to sponge red, grey and blue ink to create a colorful backdrop to complement the paper. The effect of the sponging created a water colour look, you can see a close up in the picture below.  I used a word collage stamp for the title block in grey and to highlight Joy, I stamped it again in red and cut out Joy and used 3D foam tape to lift it. I finished off the layout by adding glitter tape and some jewels. 

A close up of the water colour look of the inking in the red snowflake. 

Monday, November 2, 2015

Calgary Scrapaholic Session 3 Class 3


This Jackson paper is from the previous catalogue, but it's still a great paper pack. It's quite versatile, however, I still stuck with the outdoor theme. This layout is great for camping, hiking or day trip pictures.  I accented the layout with some wooden buttons and some antiqued brass durable studs. 

Sunday, October 25, 2015

Scrapaholics Unite Session 3 Class 2

I found these super cute 3D halloween stickers at Michaels the other day. They went really well with this layout that I had planned for halloween for this week. This layout is also versatile as a non-Halloween layout, just use some different embellishments and a different title. Each of the slate cardstock pieces are a mat for a picture. You can also use one of them for journaling. The right side of the page is for 2 3/4 x 2 3/4" photos. The left side holds 4 x 3" photos. 

Sunday, October 18, 2015

Scrapaholics Unite Session 3 Class 1


Welcome back to my class! It's been a long time, but we're back in the swing of things and I have a new Idea Book to work with. This paper, Sarita, is from the Annual Inspirations Idea Book and it has such wonderful colors in it. Great for lots of different layouts. While I somewhat went more autumnal with this layout, it is quite versatile. The boldness of the chevron complements the more ombre page. I used the cricut to cut out the half circles, leaves, and sign. 


To add a bit of extra to the page, I added stickles in complementary colors to the stamped tree. I also popped up the title sign

Sunday, April 19, 2015

Scrapaholics Unite Session 2 Class 12


I love when I can use embellishments that I've been holding onto forever as I feel justified then in hoarding my vast supply of scrapbooking stuff. These feathers I got in a warehouse box from Bella Blvd almost 2 years ago. The feathers fit in perfectly with the new Jackson paper pack. This hexagon layout from Scrapbook Generation worked so well, I only modified it slightly. I popped up a couple of the photos and the title, and was able to cut out all of the hexagons on my Cricut in a couple of minutes. Once the pattern was set, it was fairly easy to finish. 

This is the last class of this session. I'm hoping to start another session in the fall, but I'll definitely be posting some projects from the retreat that is coming up the first weekend in May. Stay tuned!

Sunday, April 12, 2015

Scrapaholics Unite Session 2 Class 11


This is the new Blossom paper from the Seasonal Expression 2 catalogue. It's bright and summery so what better theme to choose than ice cream! This is the June Stamp of the Month so if you like this stamp set as much as I do, you are able to purchase it during the month of June! I accented with some oversized brads I had. 


To add some 3D element to the ice cream, I first stamped on the base page in the neutral Desert Sand. I then stamped the ice cream again on an extra piece of cardstock in the colors, cut out what I wanted popped and then adhered with 3D foam tape. 

Wednesday, April 8, 2015

Scrapaholics Unite Session 2 Class 10


I'm highlighting the Love Ya Silly stamp set from the Seasonal Inspirations 1 catalogue, which is still available to order (you can view it here). I love the little monsters and the sayings that go with them. In order to fit the sayings on the circles, I curved the stamps around the monsters while on the block and then inked and stamped them. I used kraft paper as accent cardstock for the circles and pennants to tie in the kraft bows. 

Monday, March 30, 2015

Scrapaholics Unite Session 2 Class 9


I had almost forgotten about this stamp set when I was looking for inspiration for this week's layout and saw another rainbow layout. The stamp set, Rain or Shine is from the Annual Inspirations 1 catalogue. I used multiple patterned papers from several B&T packs to create my paper rainbow. Using a Cricut cut of a cloud, I stamped the title onto it and I also stamped a sun on a circle to place behind it to emphasize the title. I also stamped the little rainbow, then colored it in with pencil crayons. I finished it off with heart shaped brads in multiple colors.    

Clouds and rain stamps on the block to create random stamp.

I created a custom background by placing the clouds and rain altogether on a block then stamped it in succession on the Whisper Grey paper using Whisper ink.  

Close up of background stamp.

Sunday, March 22, 2015

Scrapaholics Unite Session 2 Class 8

I was going through my stamps looking for a sentiment for a different layout when I saw this stamp and remembered that I really wanted to use it for a layout this session. This saying is from one of my favorite books called "Guess How Much I Love You". It is such a good book to read with your children. If you don't have it or have never read it, go get it now and be prepared to read it with some tissues. The You Rock paper is from eons ago, bit it fit so well with the stamp. I wanted the sentiment to be just a colorful as the paper so I used an ombre technique here. See the step by step instructions below. 

To finish off the layout, I used first, second and third generation stamping with a star stamp that overlaps. As well, I created a sunburst flourish with some rhinestone flourishes to bring some bling to the page.   

Step 1: Ink the stamp allover with the lightest colored ink (Goldrush)

Step 2: Ink the top 2/3 of the stamp with the 2nd darkest ink (Olive)
Step 3: Ink the top 1/3 of the stamp with the darkest ink (Indian Corn Blue)

Step 4: Stamp the sentiment as normal on cardstock.
Finished piece on the layout. 

Monday, March 16, 2015

Scrapaholics Unite Session 2 Class 7


This layout will be different for each person attending class as I introduced the Picture My Life cards into this layout with the 4x6 paper on the right side. I chose a cute rainbow card, but the cards range from Happy Birthday to just a cute picture. I like that it brought in the Garden Green color to the Babycakes paper pack as some of my customers thought that the Chocolate, Slate (grey), Sunset (orange) and Buttercup (yellow) colors were too retro for their liking. The Garden Green brings in a softness and updates this paper pack a bit. I also brought some texture in by using Slate ribbon as the bottom pennant and I also added some cork circles to the top right. 

Sunday, March 8, 2015

Scrapaholics Unite Session 2 Class 6


I love this stamp set, it's the July Stamp of the month called Life is Wonderful. I've paired it with an old paper pack called Laughing Lola. It's got some great gold accents and swirls that I've accented by heat embossing the title and adding the flourish on top. If you like this stamp set as well, it's available to order during the month of July. 

Sunday, March 1, 2015

Scrapaholics Unite Session 2 Class 5


Yes I still have some of this bulk paper left! Some of my students who love winter layouts will definitely want this one. This is old paper from CTMH, but definitely one of their best designs and I have used it several times for classes, this is Aspen. I think that the colors are what works as well as the design. It makes this paper timeless and that is always desirable. The cuts are pretty simple, but the title is a bit more difficult. I've broken down the steps below in case you want to repeat it at home. To accent the layout, I found this great paper garland with sparkle circles on it and I just stamped some winter images along the bottom and made a pair of mittens from the Artist Cricut cartridge and adhered them using some grey and white bakers twine and 3D foam tape. This layout is all about the title so I hope you like it!

Step 1: Stamp title with dark color, I used Outdoor Denim
Step 2: Randomly stamp different snowflake stamps in 2nd darkest color, I used Twilight
Step 3: Stamp more random snowflakes using the lightest color, I used Crystal Blue
Step 4: Using a different and smaller snow flake stamp, stamp accent flakes using the accent color, I used Creme Brulee. I also used an even smaller snow flake stamp and did second generation stamping using Outdoor Denim to fill in some holes. 

Step 5: Cut out each letter and adhere to layout using 3D foam tape

Tuesday, February 24, 2015

Scrapaholics Unite Session 2 Class 4


This cute paper is Hopscotch. The idea of this layout came from the zipstrip on the paper as it has a bunch of speech bubbles in different shapes and colors. I then cut out a bunch of different sized speech bubbles and stamped different sentiments to highlight the theme as well.  

Monday, February 9, 2015

Scrapaholics Unite Session 2 Class 3


This is the Brushed paper pack and when I originally saw it in the book, I wasn't a huge fan of it because of the big bright flowery print. I do like the other pages in the paper pack though and using only part of the bold print really brings the whole thing together. I also used a cricut overlay from the Artbooking cartridge to cut down on the boldness as well. I feel that it adds almost a window pane feel to the flower print. This layout would be good for a generic spring layout or as an Easter layout as well. To add some extra texture, I used washi tape, some paper flowers and brads and some rhinestone flourishes. 

Monday, February 2, 2015

Scrapaholics Unite Session 2 Class 2

Valentine's Day is right around the corner and the Heartstrings paper pack is perfect to document all your lovely pictures. I like the contrast of the Lagoon and Whisper grey colors with the Cranberry and Hollyhock. I brought a lot of texture to this layout by using pattern stamps, such as the border on the right side. As well, I used the patterned paper from the pack along with the zipstrip which is the piece of paper with the arrows on it. There is versatility in the layout with the pictures as you are able to rearrange the placement to suite your needs.


I didn't use one large title this time as I felt that there was enough with the stamped sentiments. To customize the Dimensional Element chipboard hearts, I stamped on them using different patterns and then layered them with 3D foam. 

Sunday, January 25, 2015

Scrapaholics Unite Session 2 Class 1


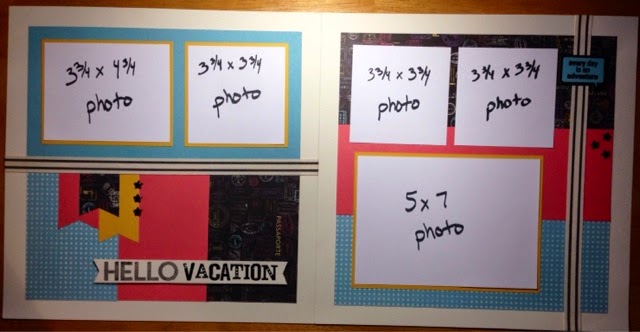
Well it's time for another session of classes. There are still some paper packs from the CTMH Annual Inspirations catalogue that I have yet to use, this week's layout is using one of them. This paper is from the Wanderlust pack. It has a great neutral blue polka dot pattern as well as a black with stamps from passports in all the colors of the pack. This paper made it easy to coordinate all of the cardstock on this layout. You will probably see more of this type of layout without pictures during this session as I am making them in preparation for events coming up (Valentine's day maybe....). 

I like the versatility of this layout with the placement of pictures as each person could move around the mats and actually add more pictures if needed. 

To complete this layout, I heat embossed the title and the sentiment on the top right of the layout and added black enamel stars. Another option is to emboss the smoothie (pinkish) paper with a pattern to add even more dimension. 

There is still room in my class on Wednesday, so if you want to drop in, please let me know!