Background

Monday, February 20, 2012

DRCC Session 2 Class #1


Hello Ladies, Welcome back to class and a warm welcome to the new ladies who will be joining us. We're going to be having lots of fun with the new papers from CTMH this session. I can't wait to start working with them. This weeks class I pulled out an oldie (but a goodie) paper pack that I have called Boom-di-ada. It's got some great colors and is perfect for flirty girlie pictures. As it's the first class of a new session, I figured I would ease everyone back into the swing of things with an easier layout.


I overlapped the words on the title to give it a bit more depth than normal and added a ric rac bow for an accent.

Come back soon for a look at next week's layout.

Saturday, January 28, 2012

Rock the Block Calendar


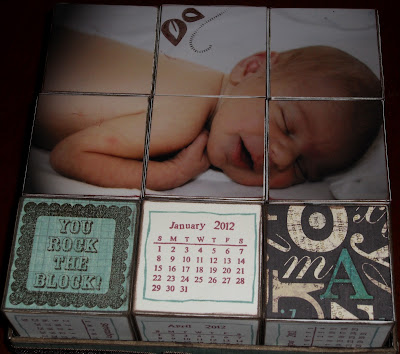
The Rock the Block is a promotion for January with CTMH. When I received the Collage Cubes, I asked myself what would I ever use it for? Since I'm going back to work very shortly, the idea of a desk calendar that can also display pictures came to me. I started off with inking every edge of the Collage Cubes so that you see Cocoa instead of stark white. I also stamped on 2x2 pieces of cardstock for the calendar and then used the E sized stamp that came with it (the Rock the Block Stamp Set) for the additional 6 sides I needed.


The trick was to fit the photos on. In order for them to fit properly, the photo needs to be just under 4x6" so that the edge of the photo doesn't go off the side of the cube. I cut 1/16" from one side and the top or bottom of the picture. Once I cut the picture into sixes, it was super easy to fit onto the cubes. To add some flourish to the photos, I stamped different images using Staz-On and let them dry before adhering the pictures onto the cubes. 


The final step was to add paper to the tray that the cubes sit in. I added some sparkly ribbon and a buckle around the outside to finish it off. 

If you would like to order your own Rock the Block Stamp set and Collage Cubes for only $15, check out the CTMH flyer here and then email me before January 31 with your order or any questions. 

Thanks for stopping by!

Thursday, January 19, 2012

DRCC Session 1 Class #10


This layout is going to be a bit of a challenge as during class I will not be displaying the completed layout. I will include with the packages a print out of the sketch of the layout and sizes of the pieces of paper. This is to help my students to be able to follow a recipe as well as learning about measurements. We did get to use some of the new butterfly flutter paper shapes on this layout. 

This is the last class of this session, but I will be starting another 10 classes on February 21, 2012 with all new layouts. I will be posting the projects the week before as I currently have been doing. I hope everyone has enjoyed being in my class and I hope you are able to join me for another session. 

Friday, January 13, 2012

DRCC Session 1 Class #9


I used 2 techniques for this class that are new; tearing and emboss resist. Tearing is ripping paper to reveal the white core and to give an uneven edge. I thought it added some snow-like qualities to my winter layout. 


Emboss resist is when you emboss on white paper using white embossing powder and Versamark ink. Then using coloured ink and a sponge, rub the ink overtop of the paper to reveal the white embossed image. 

Tuesday, January 3, 2012

DRCC Session 1 Class #8


For this class I kept the layout fairly simple as the lettered paper is quite busy. I punched holes through the new Milepost stars to create a cool 3D accent, then strung a piece of hemp through the holes to make a banner. 


I found these cute little paper bags that I thought made a good spot for some hidden journaling or a special stamp like I did here. 


For the title, I cut out this shape on my Slice and then used rub-ons for the letters. This is the Typeset paper and it is great for school pictures as well. 

Thursday, December 8, 2011

DRCC Session 1 Class #7


Considering it's almost 2 weeks until Christmas, I thought a holiday layout would be nice for the last class before the holiday break. For the title, I cut out Noel on my Slice and placed it on top of vellum with 3D foam to. I then accented with some gold stretchy cord. I also used the cord on the stockings. 


For the accents, I stamped them on Colonial White paper and then cut them out so that the detail in the stamp is more visible. I heat embossed the sleigh runner in gold directly onto the layout to give the it some extra shimmer. 

We don't have a class until January 10, 2012 but check back here as I hope to keep posting some of my other projects. Merry Christmas!

Friday, December 2, 2011

DRCC Session 1 Class #6


This was a slightly challenging layout as I originally had a lot of white space at the top. White space can be important in a layout, but not if it makes the layout look too sparse. I will make adjustments to this layout in the future as the picture on the left side should be a 5x7 and of course I need to journal on the piece of cardstock on the right. This layout can also be flipped so that the yellow is green instead. It depends on the pictures used. 


The technique we will be using in class will be stamp kissing. That is when you take a solid stamp and kiss it onto a patterned stamp to give the image texture.