Background

Sunday, November 19, 2017

Scrapaholics Unite Session 7 Class 10

Yes this is more Christmas paper, but I'm not using it as that. I will be putting my son's soccer pictures on this layout. I also stamped the title using an alphabet stamp so that it could change in case each person wants to change the theme of the layout. If you would like to change it to a Christmas themed layout, you can switch the black patterned paper over to the Christmas word art paper from Silver and Gold. 

To made my own gold stars using some gold foil paper, a punch and a star thin cut. I did Cricut cut the black and red stars. I also accented with star gems and gold shimmer tape. 

Scrapaholics Unite Session 7 Class 9

Another blast from the past, this is the Pear and Partridge paper, I combined it with the new Bearly Christmas paper, which is the green patterned on the bottom. An alternative layout is to use the Bearly Christmas paper with the back side of the Pear and Partridge as that is also a green with a mild pattern. Each person is able to choose a Picture My Life card to go on the right page, I chose a beautiful triangle tree as I am hoping to put pictures of our pear tree with a partridge sitting in it on this page once we get our Christmas decorations out. Alternatively, you can stamp the Santa in the middle of the extra piece of cardstock and use that piece as the PML card. The title was cut using the Artbooking Cricut cartridge and I popped up my Santa using 3D foam tape after fussy cutting. I completed the layout with a cute kraft bow and a coloured paper clip.

Scrapaholics Unite Session 7 Class 8


I had a couple of requests to do a travel page and since my sister and I went to Paris in May, I had to scrapbook some of those pictures. These are all 4x6 photos but amazingly there are 6 on this page and there is still lots of room. I used two old paper packs, but because they are solid colour patterns they work well together. I also used the zipstrip from one paper pack as it used both the sorbet and the outdoor denim to tie it all in. I pulled the light brown (champagne colour) from the background of the sorbet print. I also used my Paris pictures so that I could take advantage of the fleur de lis pattern on the Outdoor Denim patterned. I finished it off with some Cricut cuts and a cool title. Alternatively, you could add some smaller pictures in place of the journaling spot. 

Monday, October 30, 2017

Scrapaholics Unite Session 7 Class 7


I saw these 2 separate layouts in the idea book and online at CTMH and loved how they were done and thought that they would look cool as a 2 page layout for my class. I found some black and white patterned 6x6 cards that I had stashed in my card box that I haven't used in a while that looks really cool with this geometric pattern. combined with some black and lagoon cardstock, I love how this layout pops out. I completed the layout with more patterned washi tape, glitter tape and some black dots. I also painted the title with the shimmer brush to give it some subtle sparkle. The two pages can also be split by adding a title onto the left page, then you have a cover page and an end page for your books. 

Sunday, October 22, 2017

Scrapaholics Unite Session 7 Class 6


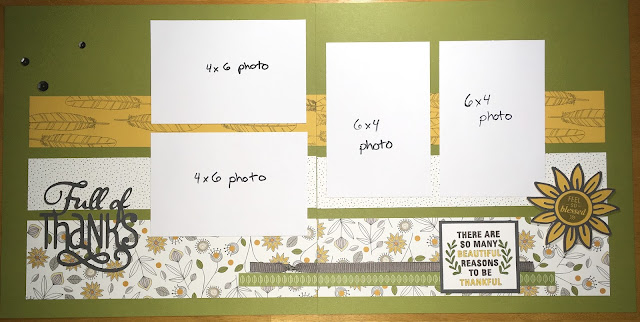
This layout features the Feel So Blessed September Stamp of the Month. It has a beautiful feather image as well as some lovely sayings on it. I created the feather paper strips by randomly brick layering the feather stamp set using one of the new CTMH colours, Charcoal. I used the Falling For You paper pack as the patterned paper. I accented the page with a lovely flower Cricut cut and the title from the Flower Market cartridge. I used one of the many sayings from the Feel so Blessed stamp set which features outlined letters that I took advantage of and coloured in on the sentiment using the yellow for the two words I wanted to stand out. I also coloured in the leaves that I stamped to frame the sentiment. To complete the layout, I used the zipstrip from the Falling for You paper pack, some grey ribbon and grey sequins.

Friday, October 13, 2017

Scrapaholics Unite Session 7 Class 5


This was a combination of Jeepers Creepers from 2016 and the new Cats and Bats paper. I like the effect the black and white stripe make on the layout as well as the accenting of the monster paper. I used the Mini Monster cartridge for the Monsters title and the witches hat and accented with some glitter tape and a couple of halloween accent stamps. 

Sunday, October 8, 2017

Scrapaholics Unite Session 7 Class 4


This week's layout is made by a guest designer, Carissa Peach. She's my very talented sister/photographer and while she was visiting me during the summer she helped me out by creating this super cute layout. She actually credits my son with the idea as he tells the cutest kid joke: 

Kid: What did one cactus say to the other?
Parent: I don't know...
Kid: You look sharp!

He delivers that joke in the best way. Totally corny, but when you have cactus paper and some super cute colours, it makes for a great title! She also cut out some extra cacti from the Flower Market Cricut cartridge and then accented with some cute stamps. I also like that she incorporated the supercute zipstrip from the Prickly Pear paper pack on the top of the right photo well. To add some texture, she did a background tone-on-tone stamp on the Tangerine paper on the left. 

Saturday, September 30, 2017

Scrapaholics Unite Session 7 Class 3


With the snow apparently descending on Calgary tomorrow evening, this seems like a great time to break out your beach pictures especially considering how hot it's been this past week and now snow in the forecast. That is Calgary weather for you. I'm using the No Worries paper for this layout again. If you attended my Spring Banff retreat, this is a great accompanying layout to the one we did at the retreat. Not the same, but with the same paper pack and tones, it would be perfect for the same beach trip. For this layout, I did get to play with the new You Are Here Cricut Cartridge and coordinating stamp sets. It is the perfect cartridge for travel. Can't wait to do my Paris trip with the cartridge! I also used the stamp set that you can only exclusively get when purchasing the cartridge. I repurposed a banner that I used for my daughter's luau birthday party by using the twine, the die cuts of palm trees, pineapples and flowers that has this great gold trim. The set also included some cute mini gold studs that I didn't wind up using on the banner, but looks great on this layout. 

Sunday, September 24, 2017

Scrapaholics Unite Session 7 Class 2


If you need a place to put some colourful photo's then this is the layout for you. Using the Little Dreamer paper from the last Seasonal Expressions book. You could make this layout more magical by flipping the paper and using the rainbow unicorn side. It is fabulous! To add some shine, I used the foil tape along the top and added some Bitty Sparkles around the stars. I also used my Cuttlebug to cut out the rainbow half circle shape and the banner prior to stamping them. If you are going to use the rainbow unicorn paper, I do also have the coordinating die cut and stamp set as an option instead of the rainbow. 


Rainbow Unicorn Patterned Paper

Monday, September 11, 2017

Scrapaholics Unite Session 7 Class 1


I admit it, I'm obsessed with the Jack paper pack, but I have a weakness for red and black plaid. Unfortunately the bulk paper doesn't use the red and black plaid, but it does have this cute tree print. Alternatively the back side of the tree print is a cool lumberjack pattern. I'll leave it up to you on which side you prefer for your layout, they are both pretty cool. I used a double layered Cricut cut for the title and stamped various images and sentiments throughout the layout. I accented with a few triangle studs. 

Saturday, April 22, 2017

Scrapaholics Unite Session 6 Class 12


I've been waiting for the right layout to use this cool stamp set, called Ink Blot, for the random stamping on the background on the base pages. I like the bright colours from the Some Kinda Wonderful paper and wanted to play them up. I also echoed the same colours in the title using a large Alphabet stamp, Rustic Alphabet, and cut them out and popped them up. To finish off, I added some black shimmer trim.

Monday, April 17, 2017

Spring 2017 Scrapbooking Retreat Workshops

Hi all, I've actually finished the workshops for the retreat, before the retreat. I think this might be a record. Now hopefully I can prep them in time too. 

These cards use the Sugar Rush paper. I designed these so that they can be changed around if wanted, the You're Sweet card could be a Thank You or a Birthday card. By changing the sentiment on the front of the ice cream card, it could also change to something else. Versatility!

Father's Day Card and Mother's Day Card

The Father's Day card features the new paper pack from the Season Expression 2 catalogue called Jack (I may rave about it all weekend as I positively looove the red and black plaid). This card can also be changed to something other than Father's Day by stamping a different sentiment on the bottom. The Tea-rrific card is another versatile card as it can change depending upon the inside sentiment, but there is a matching teacup that says Happy Mother's Day that I stamped inside. This card is also using the gorgeous Live Beautifully paper that will be featured for National Scrapbooking Month in May.


Another new paper pack, No Worries is a beautiful beachy/nautical paper. I created this cute 2 page layout that is great for a lake, beach or somewhere with a tropical beverage.

Sunday, April 16, 2017

Scrapaholics Unite Session 6 Class 11


This layout has a preview of the May stamp of the Month, called Live, Laugh, Love (S1705). I've always loved this saying and the letters with the flowers inside are just beautiful. I decided not to colour the flowers in on this layout as I liked the look of the green myself, but I encourage my students to do so if they would like to. This layout uses the Hello Lovely paper along with Sorbet and Sea Glass cardstock. I like that while there is minimal patterned paper, it is still very impactful and has lots of room for pictures.  To complete the layout, I added some gems in the Sea Glass and Sorbet colours, then some washi tape and the blush shimmer ribbon. This layout is great for family, heritage, spring, or any occasion where there is lots of love and laughter. 

Sunday, April 9, 2017

Scrapaholics Unite Session 6 Class 10


I hope this layout makes everyone want to cozy up to a fire and roast some marshmallows. This is a cardstock only layout using the Camping Critters Cricut cartridge. It has such cute animal characters and sayings. I also added some wood grain embossing to some of the pieces, such as the large picture pennant. I created the background on the left page by stamping in White Daisy ink and then using white heat embossing powder. 

Sunday, April 2, 2017

Scrapaholics Unite Session 6 Class 9


In honour of our Country's 150th birthday this year, I came up with this Canada Day layout. I created my own stamp word puzzle for the red strip on the right with some phrases and pictures from a couple Canada stamp sets I have. I fit the stamps together into a square and then stamped in a brick pattern. To add some pattern, I used the Magical paper pack from last year's Seasonal Expressions catalogue. For the mountie, I stamped a mask of the mountie and then stamped a quote for the background on white cardstock for the bottom of the left page, I then separately stamped the mountie on white using red ink and cut the image out. I adhered only the part of the mountie that went onto the cardstock so that I can slide my picture in later. I curved the O Canada stamp set to fit on the ribbon cut out from the Cricut. I stamped a flag and some fireworks on the base page and made the fireworks glitter with the gold shimmer brush. I completed the layout with some red and white gems and ribbon.

Sunday, March 26, 2017

Scrapaholics Unite Session 6 Class 8


With spring break happening this week, Easter is right around the corner. This super cute bunny stamp set was the February stamp of the month. I paired it with the Dreamin' Big floral paper. For the title, I stamped it multiple times in Whisper gray and once in Poppy red to make it pop. I coloured in the flowers on the top border stamp to add some colour. I added accents to the patterned paper on the right side and then completed that side with the cute "There's nobunny like you" stamp. 
I have made this layout with an optional advanced technique which I detail in the steps below by stamping on Washi tape and then cutting out and placing on top of the original stamps. 

First, select washi tape that is wide enough for the portion of the stamp that will be cut out. 
Place the washi tape on wax paper and stamp the portion on the stamp onto it using archival black or Staz-on ink.


Cut out most of the stamp, leaving part of the image uncut. Then peel off of the wax paper and finish cutting the washi tape. If you do not remove the partially cut image prior to finishing the cutting, it makes it very hard to peel afterwards - I tested and tried and failed twice before realizing this so please heed my words!

Adhere the cut out piece directly on top of the fully stamped image. I'm loving the pattern and dimension these cute shirts lend my little rabbit family. 

This is the layout prior to adding the washi tape shirts. This is the easier layout and just as cute as it only requires stamping and a bit of colouring on the top border of the flowers. I should mention I forgot to add the buttons prior to taking the picture so please be aware that the buttons are still part of the layout. As an alternative, you can also stamp Happy Spring instead of Happy Easter or another saying. 

Sunday, March 19, 2017

Scrapaholics Unite Session 6 Class 7


I think that everyone has some Stampede pictures stashed somewhere in their piles of photo's. What better way to showcase them than on this super cute western layout. This used a combination of some paper packs and cardstock without overpowering the layout. I also always enjoy using Kraft paper for the base pages, it give a rustic feel to the layout. I used the Old West Cricut cartridge for the title Saddle Up and the pocket handkerchief. The stitched detailing on the pocket was done by using a white gel pen and a couple of silver brads and a folded over piece of washi tape. The handkerchief is tucked inside the pocket to be used as hidden journaling and just slides out to reveal the tale. To complete the layout, I stamped a lace image, added a washi tape pennant and a wooden star in the bottom right, I then used a blue pen and drew on stitches around the patterned paper and the handkerchief to tie everything together.
The handkerchief journaling piece outside of the pocket. 


Thursday, March 9, 2017

Scrapaholics Unite Session 6 Class 6


The more I look at this layout, the more versatile it becomes to me. I used 3 different paper packs left over from previous classes to create this layout but used the stamp sets to really set the theme. Instead of a road trip, this could also be a great overseas layout such as Europe. Because of the scrabble paper and the lettering, just change the stamp set and title used and it would also make a great school layout. Since I already held my north blitz class this past Sunday, a few of the ladies used the province stamps instead of the van. They also selected a different title that was more suited to their destination. 

To finish off the layout, I inked the edges of the base pages with black ink and sanded down the black photo mat cardstock to also distress. I used arrow washi tape and placed it around the layout directing your eye from one side of the layout to the other in a bit of a maze pattern. I also incorporated a metal arrow on the top right into my arrow maze. This also adds some 3d dimension. After stamping my images on colonial white cardstock, I cut them out and popped them up with 3D foam tape. I stamped my title directly to the base page.

Friday, March 3, 2017

Scrapaholics Unite Session 6 Class 5


In my wish for warmer weather and to be able to be outside for longer than 10 minutes without freezing, I created this cute BBQ/Picnic layout. This is the Dreamin Big paper pack and I love the use of the Poppy red, Slate grey and Juniper colours together. I played up the red a bit more in this layout because I always think of a red checked table cloth for a picnic. 

I only used one side of the patterned paper as I will be using the opposite side, a beautiful floral, in an upcoming class (maybe with some cute bunnies on it...). To add some dimension, I embossed the long Poppy strips with the Wood Slats folder to make it look like a picnic table. In order to get the entire strip embossed, I did one half, then flipped the paper and embossed the other half. Because it's an uneven pattern and it's going to be covered up eventually, I didn't worry about the middle section aligning. 

I made the title block using Cricut Craft Room and the Artistry Cartridge. It was super easy to size the title and to then also cut the rectangle to the correct proportions. The far right block I just stamped a BBQ and a few accessories, but you can leave it blank for journalling or place another picture there. I then added the Poppy twine. 

To complete the layout, I cut up some words from the zipstrip and added some sequins in the bottom right

Sunday, February 26, 2017

Scrapaholics Unite Session 6 Class 4


This week is about the Hello Lovely paper. This beautiful floral has a great colour combination with Sea Glass, Sorbet, Fern and New England Ivy. I themed this layout as a love layout, which can work for anything from family, kids, couples and weddings. To add some interest to the layout, I used the January stamp of the month called Adore You. It has a lovely script title and some beautiful flowers and sayings. I also used the new shimmery blush ribbon on the right page. 


For this heart, I stamped the full image once in Sea Glass and cut it out. Then I stamped just the flowers and leaves in Fern and again in Sorbet. I cut out all of the flowers and leaves for the Fern stamp, then adhered them to the heart with 3D foam tape. I cut out only the flowers from the Sorbet stamp and directly adhered them to the Fern flowers to create some dimension. I finished the heart off with the saying in Sea Glass. 

Monday, February 20, 2017

Scrapaholics Unite Session 6 Class 3


This is a combination layout using a few different paper packs, Zoe, Blossom, Penelope, and Chalk It Up. The colours are all reflected in the Chalk It Up star paper. I echoed the stars on the bottom by stamping a star border on the lagoon strips. I added lagoon washi tape at the top to complement the bottom strips. With some cricut cuts of music notes and the title, plus a few fun words underneath the papers on the left side, the layout was done.

Monday, February 13, 2017

Scrapaholics Unite Session 6 Class 2


No risk of a real Sugar Rush here, it's only paper. Cute little donuts and ice creams dot the pages of the Sugar Rush paper pack. Working with this paper might make you a little hungry though. Then stamping the delectable desserts onto the page, that won't help either, plus we'll top it off with glitter! I used the new shimmer brush pen and it's pretty sweet... no mess here and it dries quick too. I shimmered sprinkled in the title and added some more to the desserts that also had sprinkles. It's a bit hard to tell so I took a close up below.


I drew on some sprinkles to echo the ones on the donuts with markers. added some glitter dots and the page was done. Don't eat it please!

Sunday, January 29, 2017

Scrapaholics Unite Session 6 Class 1


Welcome back everyone! Another session is starting and I hope everyone will be excited for the new layouts. I've got some cute ideas I'm hoping to try. If you have any suggestions for topics of layouts, please feel free to email me. 

The first layout is featuring the new Some Kinda Wonderful paper pack. I've been itching to do a coffee layout, but it's easily transformed by not using the coffee cup and savoring something else. I like the format of the pictures in this layout by clustering them but having lots of room for multiple pics. There's also room to add smaller pictures that aren't matted. The coffee cup will can also serve as a journaling space. 

I completed the layout by adding a chalkboard pennant and used the Chalkboard Marker from CTMH to write #coffee. I also used the zip strip sayings and added them in that corner as well. I used the CTMH Artistry cartridge to cut out Savor and the coffee cup. Finally, I placed a heart jewel inside the heart on the cup cozy and popped the coffee cup with 3D foam tape.