Background

Showing posts with label Pennants. Show all posts

Tuesday, April 24, 2018

Session 8 Class 10


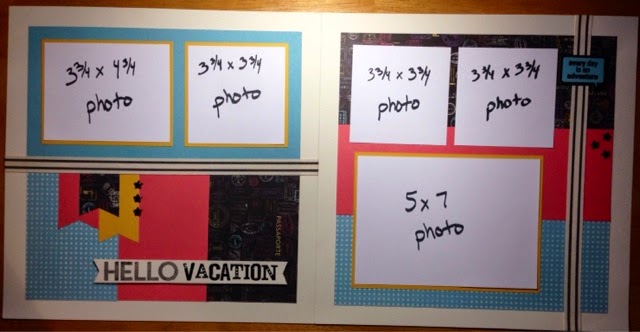
Once again, another session is ending. At least I got pictures on this layout. And they're only from last summer! This paper is from one of my all-time favourite paper packs - Jack! I love the versatility of it and the colour combination is so cool. If you want to go more outdoorsy, you can flip the tree paper to show some lumberjacks. I might have to make another one for a certain lumberjack in my family! I also have been wanting to use this super cute Boler RV stamp set so I created my own border paper with black ink and Juniper cardstock. I cut the title out from the Campin' Critters Cricut Cartridge and used the zip strips to frame the large picture on the left side. You could make that photo portrait as well and then place the zipstrips on the sides of the photo instead of the top and bottom. To complete the layout, I created my own pennant banner to echo the one on the Boler stamp. To add a bit more colour, you could colour in the pennant on the stamped image as well. 

I think this is a great layout to start everyone's summer with. If you don't already have pictures you can definitely take some this summer! See you again in the Fall!

Monday, November 14, 2016

Scrapaholics Unite Session 5 Class 8


It's a party! This is a great layout for any celebration. I used some leftover paper from the For Always and Yuletide Carol. This is busy patterned paper, but when it's in small pieces and strategically placed around the page, it ensures that the patterns don't over power the layout. I finished it off by heat embossing the title with black embossing powder. I also used a scallop border punch for the black strips that go over the pennants, some gold sequins and random background stamping of confetti. This is a great layout for almost any paper and it allows for a large number of pictures. 

Monday, February 29, 2016

Scrapaholics Unite Session 4 Class 5


I have had a few people say that the didn't really like the La Vie En Rose paper pack. Now I've said this about a few before so I held my tongue about this one and just thought, well, you need to see it differently sometimes, that's all. When you see the paper in the catalogue, you're somewhat thrown off by the big bold print of the flowers that you don't notice the really cool geometric black and white patterns in it. So I decided to play it up a bit by using the new Cascading Charms stamp set along the bottom of the layout. Then with the flower paper and the black and white paper and a white matte, it really plays up the red and makes the flowers more subtle. I accented using the zip strip on the top right and added a simple title. 

Sunday, January 25, 2015

Scrapaholics Unite Session 2 Class 1


Well it's time for another session of classes. There are still some paper packs from the CTMH Annual Inspirations catalogue that I have yet to use, this week's layout is using one of them. This paper is from the Wanderlust pack. It has a great neutral blue polka dot pattern as well as a black with stamps from passports in all the colors of the pack. This paper made it easy to coordinate all of the cardstock on this layout. You will probably see more of this type of layout without pictures during this session as I am making them in preparation for events coming up (Valentine's day maybe....). 

I like the versatility of this layout with the placement of pictures as each person could move around the mats and actually add more pictures if needed. 

To complete this layout, I heat embossed the title and the sentiment on the top right of the layout and added black enamel stars. Another option is to emboss the smoothie (pinkish) paper with a pattern to add even more dimension. 

There is still room in my class on Wednesday, so if you want to drop in, please let me know!

Monday, April 7, 2014

DRCC Session 7 Class #4


I know, I have no pictures on my layout. I desperately need to send pics in to get printed, only problem is that they are on my moms computer...I'll get there, one day. I do know which pictures I'm putting in here at least so that will help. If I can get them printed in a timely fashion I promise to update this post with a newer picture. 

This is the Skylark paper pack. I like the contrast of the Lagoon and Juniper blue papers, plus the arrowed zipstrip that is along the bottom is a really nice accent and I placed them over top of some juniper washi tape. Because the paper was quite busy, I kept the accents to a minimum, but to bring out the distressing, I did ink the edges of all of the paper. I've added a cut out bird in one corner and the pennant on the right will also serve as a journaling space. 

Tuesday, November 5, 2013

DRCC Session 6 Class # 7


This is the very pretty Frosted Paper Pack. I've been borrowing a Cricut from a friend of mine and I've been putting it to good use lately. For this layout, we are visiting several spectrums: die cuts, punches, embossing, and hand cuts. The art of the layout is in the placement of the snowflakes. I hope you like it. 

Sunday, October 27, 2013

DRCC Session 6 Class # 3


I love the color combination in the Sarita paper. The vibrant Lagoon blue and the Goldrush orange are striking against the Outdoor denim blue background. I individually cut the mats for the class kits so that each individual would be able to configure their pictures according to their needs. This was also a chance for everyone to practice their pennant angle cutting. All that's left is journalling. That always takes time, but I'll get there, one day soon hopefully!

Sunday, October 14, 2012

DRCC Session 4 Class #6


I saw this layout and thought that the combination of the many patterned papers and the pennant design made this layout so interesting, yet so easy. It did make it a little bit harder to accessorize as I didn't want to make the layout even busier by over embellishing, so I decided to keep the 3D elements fairly simple, but spiced it up a bit with some heat embossing and striped stamping. This is an older paper pack from Making Memories called Spook Alley, but I paired it with CTMH card stock and inks.


I used black heat embossing to stamp these cute little pictures and this adorable saying, then I cut them out and adhered them with 3D foam tape.


To make the title striped, I first inked the word all over in the Sunset colour, if you are using different colours, stamp the lightest colour first. 


I then stamped a portion of the word using the very edge of the Smokey Plum ink pad or darker coloured ink. 


Then I stamped another stripe further up the stamp again, but held the lock with the stamp at an angle. 


I  repeated until I had a few stripes on my word stamp. 


Then I just stamped as normal on to the card stock. 

Sunday, September 16, 2012

DRCC Session 4 Class #2

The new Clementine paper pack is so versatile that you can use it for almost anything. I used it to scrapbook my niece's first birthday party, but you could use it for a western layout or anything country-esque. I embellished it with the new burlap ribbon and some hemp bows. As well as using markers to do fake stitching as borders around the base pages, journalling and my title.

Monday, June 18, 2012

DRCC Session 3 Class #7


This started out as a fairly simple layout, I added a touch of Sunset here and there and then I found these great chipboard banner pieces. It was easy enough to cover them, it was adding the 3D element. Folded paper just didn't seem to work. So off I went to 2 different scrapbooking stores. I finally found some Olive (I was looking for a dark navy color, but no luck) grosgrain ribbon with stitching so that I could pull the inside stitch together to create the circle. After that it was easy enough to add some cute stamps and glue dot it all together. 


Just a reminder to my students, class is on Thursday this week. I will see you then!

Monday, March 5, 2012

DRCC Session 2 Class #3


So after I uploaded these pictures, I realized that my Cranberry red paper looked very orange. Please don't get discouraged, I just need to photograph this layout in better light and then the color won't look so off. Once I get new pictures taken, I will replace them on my blog. 

This is somewhat of a generic themed layout using the new Superhero paper. I chose to use pictures with a Flames theme as that's what worked best for me. I used my Slice to cut out the title. I originally cut out "One of a kind", but as there are 3 Flames fans, I just cut off the "one" and then used my Slice again to cut out a large 3. 


We'll be using the scoring blade from paper trimmers in class to create the borders as well as to create these funky pennants. They're not really hard to make, you just need to know the proper dimensions. I sanded on top of the scored borders and the edges of the pennants to bring out the white core.